|
|
Post by ElvenChibi on Jan 10, 2007 20:52:37 GMT
Okaydokay, you guys ready? Herewe go! We'll draw a Chibi Cat Girl to start with. Watch this picture closely:  This is the first step: draw the head at first, make it a fine round circle, so th head can be easily shaped later. Now, draw the guidelines, like they are on the sketch. As you can see this is going to be a threeheads high chibi, so let's draw some guidelines to make sure she's three heads tall. Okay, now this is done, you can draw the ears and the eyes. Make sure the upper eyeslid is a well shaped bow and the other eyelid lays on the guideline (thicker than in usual mangas!). Don't forget the iris and the lights in them! Now finish the face with some eyebrows(place 'em high in the face). The face's done by now, for so far. Let's draw the body! It may be useful to draw the body first, and then the arms and the legs. Look at them carefully and draw. Make sure that her legs start at the second guideline. You may want to draw a guideline through her body to see where the middle is. At last, draw the tail. It has to be like the tail on the sample, since it's straight only when she's frightened! There you go! First step done! |
|
|
|
Post by ElvenChibi on Jan 10, 2007 21:06:48 GMT
Here's step two! We're going to add some details. 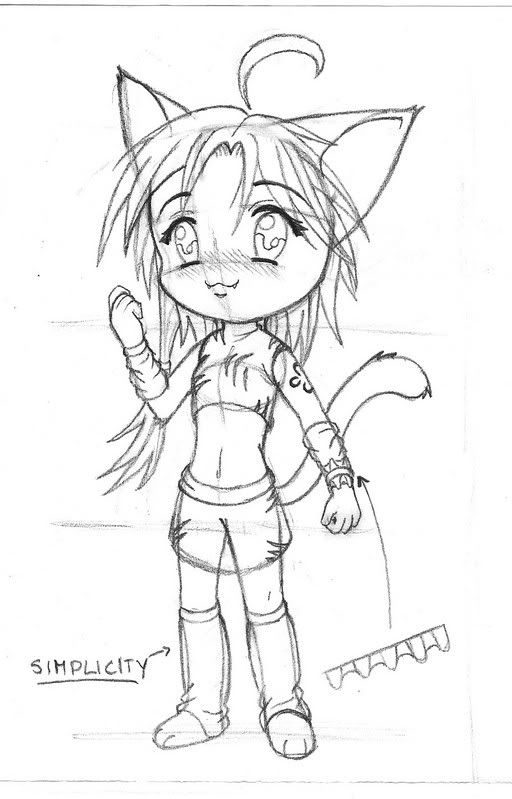 Time to draw some hairs. Draw them wild, since she is still half an animal! Before we go on, there's one rule you need to remember forever: SIMPLICITY! Chibis aren't known for lots of details, so don't add too many! In the face, I've now added a kittymouth. It has teeth as well. I've added extra lines in the ears to make them look like real ears and drew some hair on the tops of them, such as on the tail. For the clothes also counts simplicity. It has some patterns on it though, but not too much yet... She has also got stuff around her arms and legs and a tattoo in flowershape on her arm. Now the clothes aren't too hard, are they? Time for the hands. Watch out that you place the fingers right and that the hands aren't too large! Chibis have small hands! Same counts for the feet, which are kittypaws. Also mention the rushes around the arm as extra decoration! There you go! Step two: done! |
|
|
|
Post by ElvenChibi on Jan 11, 2007 8:47:28 GMT
Okay okay! Done that? Let's continue then!  And Voila! We've got ourselves a Pencil Picture! The sketch has been traced over with a lighttracer, or simply on the window with the sun shining behind it, like I do. It's important that the lines are easily to be seen, since that's necessary for the next step. It's starting to look good isn't it? There you go! Step three: done! |
|
|
|
Post by ElvenChibi on Jan 11, 2007 10:05:46 GMT
Now, you want to know why it's so important to make the lines of the last step clear to see? That's because of this:  I've now traced the pencil picture over with a fineliner and erased the pencil lines. The outer lines i drew thicker, that gives it a nice effect. NB.: Keep your hand steady for this! Make sure it's not shaking, trembling, etc. And there you go! Step four: done! |
|
|
|
Post by danosix on Jan 11, 2007 18:17:49 GMT
 I am so going to try this!
|
|
|
|
Post by Tha Chibilover on Jan 11, 2007 18:56:38 GMT
yeah im trying tight now! il post it later on out herew so u can see the result
|
|
|
|
Post by ElvenChibi on Jan 11, 2007 20:02:04 GMT
You can post your result in the subforum above this one! And I'm not finished yet, here's the next and last step:  The trick for the colour is that you have to draw one part more times and try to colour while moving your pencil in little circles! That's it! First lesson: Done!!! ;D |
|
|
|
Post by Hunter on Jan 15, 2007 15:47:30 GMT
Sweet! I like it!!
|
|
|
|
Post by ElvenChibi on Jan 15, 2007 16:29:51 GMT
Well thanks, why don't you also try it?
*click*
|
|


 I am so going to try this!


